Sunday, October 17, 2010

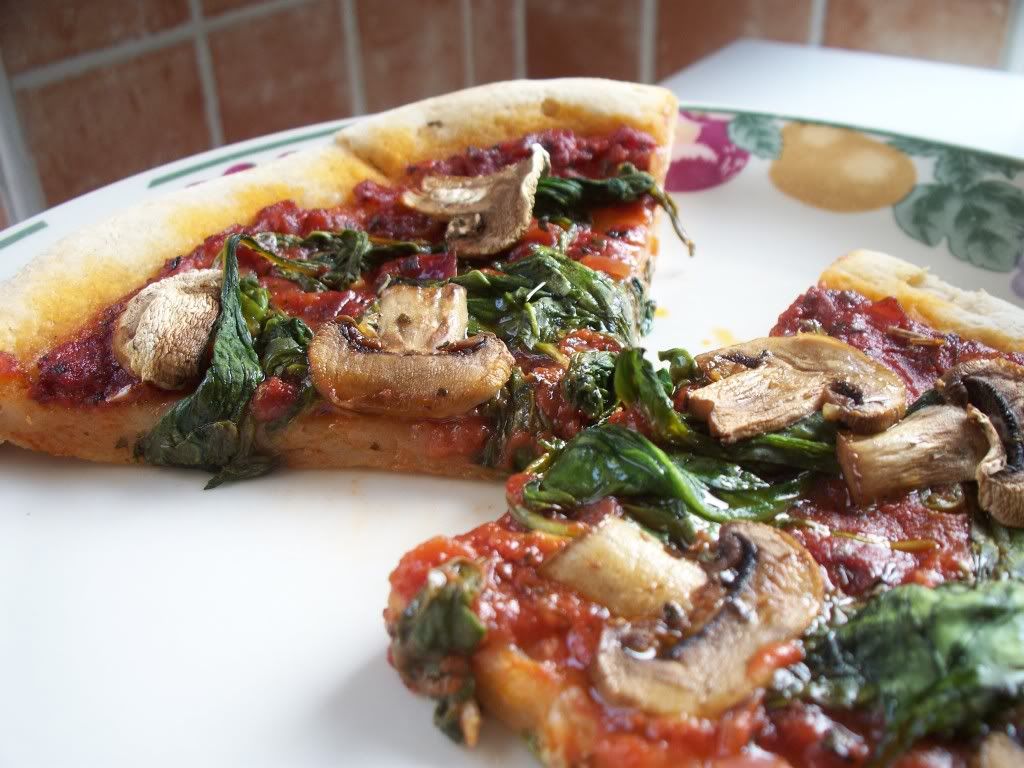
Sourdough Pizza

Gluten free and Dairy free

I'm back. I know I haven't posted anything for quite a while. I haven't had internet access for the past few months. Been missing my blog. But I've been baking away and have some recipes for you.

Pizza. This is something I know people who can't have gluten really miss. I know some friends who haven't had pizza in 10 years, even 20 years! I've been experimenting with Pizza for at least the last year, trying to get it right, and I have finally come up with a recipe that works really well.

Sourdough is the trick. It just seems to give it the right flavour. It's magic.
And Psyllium Husk Powder helps tremendously as well with the taste and consistency.

First, read my recipe for Sourdough Starter. It needs to be made in advance before you can make the pizza.

I also add packet yeast to my pizza dough as well as the sourdough starter, as I always have difficulty with rising gluten free dough, and using both together seems to work very well where I have failed in the past. and as I said the sourdough gives the pizza the right flavour.

INGREDIENTS:
2 cups gluten free flour ( I use 1 cup rice flour and 1 cup any other mix of gluten free flour)
1 Tblsp Psyllium Husk Powder
1 sachet dried yeast (about 1 Tblsp)
1 tsp salt
1 Tblsp sugar (or golden syrup)
1 Tblsp olive oil
1 cup sourdough starter
1 - 1 1/2 cups water

Tomato Sauce
Toppings of your choice

METHOD:
1) In a bowl, combine flour, psyllium husk, yeast, salt and sugar.
2) Add the olive oil, starter and water until you get a soft sticky dough. I find a soft wet dough works better than a stiff dough.
3) Scoop the dough onto a greased pan, and using floured hands pat and spread the dough into a circle, or whatever shape you want, and to whatever depth you want, depending if you want a thick base or a thin base. (This amount for me makes two medium pizzas with a medium depth crust)
4) Cover with a cloth and leave in a warm place to rise for about an hour.
5) While the dough is rising, preheat the oven to190C/375F/Gas Mark 5. And prepare your toppings. Here is my recipe for Pizza Tomato Sauce.
6) Bake the pizza dough crusts first for 15 mins.
7) Spread tomato sauce over crust and add toppings of your choice. Drizzle olive oil over the pizza and sprinkle oregano and black pepper over.
8) Bake for 20 to 25  mins.


Saturday, October 16, 2010

Pizza Tomato Sauce

INGREDIENTS:
olive oil
1 onion, finely chopped
2 cloves garlic, finely chopped
1 tsp oregano
1 tsp basil
salt and pepper
2 tsp balsamic vinegar
2 Tblsp red wine (optional)
1 tsp lemon juice
1 tin tomatoes (or fresh tomatoes, peeled and chopped)
1 Tblsp tomato puree

METHOD:

1) Heat up some olive oil in a saucepan. Add chopped onions and garlic and fry on low heat until softened.
2) Add salt, pepper, oregano and basil, then pour on vinegar, red wine and lemon juice and simmer for a couple of minutes.
3) Add tomatoes and tomato puree and about 1/4 cup water, and leave to simmer and reduce on low heat until thickened, stirring occasionally.

Sourdough Starter

To make Sourdough, you need to make a 'starter', which is basically like growing your own yeast, made with mixing Rice Flour and distilled or spring water, and feeding it (it's like a pet, it needs food and attention) everyday. The natural bacteria in the air and in the flour will grow in your starter into a living yeast, and you blend this starter batter with flour and ingredients to make dough to bake with.

Step One: Wash and sterilize with boiling water a glass or plastic container. I usually start with a small container, then as I feed the starter, I then transfer it to a bigger container.
Step Two: Add 1 Tblsp Rice Flour and 1 Tblsp Spring/Distilled/Bottled Water to the container and stir with a Wooden Spoon. It is important to use a wooden spoon, as metal with inhibit the growth of the bacteria in your starter.
Step Three: Store your starter in a warm place out of direct sunlight. It needs to be warm for the yeast to grow. I have a shelf above my fridge which is behind a door; it is like my fridge has its own little room; the motor running from the fridge keeps this little room nice and warm and is the perfect place for a starter to grow. Cover your container with a loose lid, you don't want it to be airtight.
Step Four: Every 24 hours, feed your starter twice the amount as before, i.e.on DAY 1, you fed it 1 Tblsp Rice Flour and 1 Tblsp Water, so
on DAY 2, you feed it 2 Tblsp Rice Flour and 2 Tblsp Water,
on Day 3, feed it 1/4 Cup Rice flour and 1/4 Cup Water,
on DAY 4, feed it 1/2 Cup Rice Flour and 1/2 Cup Water
Once I get to half a cup, I usually continue to feed it 1/2 Cup measurements from then on.

Then:

  • After 2 or 3 days, it will have a sour or beery smell, this is a good thing. By this point you may notice bubbles forming, but this may take a few days longer to happen. 
  • Your sourdough starter will continue to get more and more bubbly and frothy.
  • Each day liquid may accumulate at the top of your starter. This is called 'hooch', as it is almost like beer, but not drinkable. It will not harm your starter. Either stir it back in, or pour it off, depending on if your starter is looking dry or is quite wet.
Note: Some recipes for sourdough tell you to throw away half your mixture each time you feed it, but this seems like such a waste and I hate waste. I find it works just fine with my method.
If you are having trouble growing the starter or you just don't have a warm enough place to grow it, you can cheat a little and add some packet yeast to help it along.

Finally
  • Once your stater is all bubbly and smells quite sour, it is ready to use. You can use it straight away, or store it in the fridge to use at a later time. After it has moved to the fridge, your starter only needs to be fed once a week.
  • If you are using chilled starter from the fridge, you will need to proof it before you use it to bake with. Just mix your starter with 1/2 cup rice flour and 1/2 cup water, and leave it to 'proof' for a few hours or overnight. You basically want it bubbling and fermented again.
Sourdough works really well for making gluten free Pizza. I have yet to perfect a bread recipe yet, but I am working on it.


Tuesday, June 22, 2010

Little Fruit Tarts

Gluten Free & Dairy Free

I had some peaches, and I wanted to do something with them, I wanted to have something for dessert after dinner. I've been having mad cravings for fruit recently. I could just stew them maybe I thought... no that's boring... um maybe some type of peach crumble... no, that's not quite want. I want... something creamy, peaches, creamy, pie, tarts! oh what was that recipe I saw in that cookbook I have, there it is - Fruit Tarts!... oh I wish I had strawberries, alas I have no strawberries, but peaches will do. Yes lets give it a go!

And mmmmm, yum yum, just what I wanted.

Thank you Robyn Russell and your 'More Gluten free and easy' cookbook. For convenience I have the pastry and custard recipes listed as separate posts via links, so you don't have a gigantic long recipe.

INGREDIENTS:
For Pastry cases, see Shortcrust Pastry
For Custard Cream Filling see Homemade Custard
2 Peaches

METHOD:
1) Preheat oven to 170C/325F/Gas 3. 
2) Grease Muffin tray or individual tart tins.
3) On a floured surface, roll out the pastry that has been refrigerated for at least an hour, to about 1/4 - 1/2 inch inch thickness, and using cutters cut out rounds and gently place into the prepared tins.
5) Prick the bottoms of the pastry cases and bake in the oven for 10-15 mins, then remove and cool.
6) Fill the cooled pastry cases with the custard cream and place slices of peach or strawberries or other berries on top. (I peel the peaches as the skins are high in insoluble fibre and can be irritating for those with Colitis and Crohns)
7) Eat right away, or store in the refrigerator till ready to eat.


Homemade Custard

Gluten free & Dairy free

Another recipe originally from Robyn Russell's cookbook - 'More Gluten free and easy'. I changed the ingredients to make it dairy free.

This was my first time ever attempting to make custard from scratch, but it worked out perfectly. I love when things work out so well on the first try.

This is delicious to eat just as is, or serve with fresh fruit or with pies.

INGREDIENTS:
225ml coconut milk
225ml soya milk
115g caster sugar (I didn't have enough so used part plain granulated sugar and it worked fine)
2 eggs
40g cornflour
1/2 tsp vanilla
30g dairy-free margarine

METHOD:
1) Place coconut milk, soya milk and sugar into a saucepan and stir over low heat until the sugar had dissolved, then leave for another few minutes, you may see bubbles start to form around the edges of the pan. Mine didn't, but if it is quite warm to dip your finger in, like almost too warm!, then it is ready. Take it off the heat.
2) Whisk the eggs and whisk in the cornflour until smooth.
3) Slowly pour the warm cream mixture into the eggs, whisking constantly.
4) Return to the saucepan and whisk continuously over low heat until thickened. Be patient, it may take several minutes, and then will suddenly get thick.
5) Remove the pan from the heat and whisk in the vanilla, and then the margarine, a little at a time, until incorporated.
6) Pour into a bowl and cover with plastic wrap to prevent a skin from forming and set aside to cool.

Shortcrust Pastry


Originally from a recipe by Robyn Russell in 'More Gluten Free and Easy' cookbook, though I changed the ingredients and quantities to make it dairy free as well as gluten free.

INGREDIENTS:
225g Gluten freeFlour (for this I used the Dove's farm GF plain flour mix)
40g icing sugar
1 tsp xanthan gum (it really does help with the crumb structure)
100g dairy-free margarine
75g coconut milk
1 egg yolk
1 tsp vanilla

METHOD:
1) Combine the flour and margarine with fingertips until it forms breadcrumbs.
2) Add the 
icing sugar and xanthan gum and stir together. 
3) Mix the coconut milk, egg yolk and vanilla in a separate bowl. Then add to the flour mixture until it forms a soft doughy ball. If it is too sticky add a little more flour, but you want it to be soft, and not too firm.
4) Wrap in cling film and store in the fridge for later use.


Tuesday, June 15, 2010

Flour Mixes

As well as buying big bags of flour from asian supermarkets, where I get my rice flour, potato flour, tapioca flour and other flours, as you can get them in large weights for good prices there...


I'm also a big fan of Dove's Farm Gluten Free Plain flour mix. It works well in everything I've baked to date, and is handy and sells at a decent price too. You can get it in most supermarkets, like Tesco and Superquinn, and you can find it in health shops too, though probably more expensive in there. Recently I bought their Rice flour, which wasn't expensive and was very good quality. I believe you can order their flours online.


There are a lot of other flour mixes in shops which I haven't tried yet, as a lot of them are quite expensive. Dove's Farm seems to be at the best price. So, they get a thumbs up from me.

Monday, June 14, 2010

Gluten Free Flours

My favourite combination of gluten free flours is rice flour, potato flour and tapioca flour. They don't have too strong or offensive a flavour and they work well together, particularly for baking cakes and sweet things.

Cornflour and maize flour are good ones too, and not too strong in flovour. Using cornflour and soya flour with rice flour work well in baking bread, along with one of my favourite ingredients Psyllium Husk powder

I haven't found any millet flour in my searches here in Dublin, but am interested in trying it, along with sorghum flour. Perhaps I will have to find them online.

Quinoa flour and Buckwheat flour will add their own distinctive flavours, it all depends on what you want. I don't use these flours very much, but don't let that stop you.

Everyone is different and has different tastes. I can only tell you what I like to use. I think you really need to experiment with the different flours and find what you like and what works for you. Just have fun with it!

Sunday, May 30, 2010

Chocolate Brownies

Gluten Free and Dairy Free
What can I say about the brownie. It is by far my favourite treat, it's rich, it's chocolate and it is addictive. It was the first gluten free thing I ever made.

I have gone through so many variations and experimentations of this recipe and made them so many times I've lost count. The brownie page of my hand written recipe book is covered in chocolate stains. I don't think I could live without them. I make them every week and my friends are constantly asking for them, so I always make them in large batches of about 20. Somehow I still manage to limit myself to one per day.

This recipe makes about 9 brownies

INGREDIENTS:
150g dark chocolate
50g dairy free margarine
2 eggs
170g soft light brown sugar
50ml oil 
50g ground almonds
40g rice flour
1/2 tsp salt
1/4 tsp baking powder
2 tsp vanilla essence

METHOD:
1) Preheat oven to Gas Mark 3.5 / 170C / 335F
2) Line a square baking tray (roughly 9x9 inch)
3) Melt chocolate over a double boiler.
4) Take off the heat and stir in margarine until melted, then set aside to cool slightly.
5) In a bowl, beat the eggs with an electric mixer until light and fluffy (don't over do it, it should look frothy)
6) Add the sugar and beat until smooth.
7) Add the oil and beat again to combine.
8) Add the chocolate in small amounts and mix gently after each addition. Then beat well for about a minute.
9) In a separate bowl, mix the almond, flour, salt and baking soda.
10) Add the flour mix to the chocolate mix and beat for a minute or so.
11) Add the vanilla and beat a final time for 30 to 40 seconds.
12) Feel free to add chocolate chips at this point, or chopped nuts if you so desire.
13) Spread batter into tray.
14) Bake in centre of the oven for 25 to 30 minutes (It varies from oven to oven). 
(The brownies will rise in the centre when baking, you will know they are done when this has fallen and gone flat again. You don't want them  to bake too long after this.)
15) Leave them to cool in the tray, then remove and cut. Eat and drool.

Saturday, May 29, 2010

Almond Bars


Gluten Free and Vegan

I was absolutely amazed by this recipe, I had no idea how it was going to work out, one of those times where I just mixed together what I had with an idea in mind of what I wanted. 


They have something here in Dublin, called Almond fingers, I have seen them in Holland too. And I was really really craving them the other week. I can't even describe them, soft and cakey, yet almost like marzipan. When I was a teenager, my brother and I used to buy a packet every so often, we made sure to make them last, just one per day at about 4pm with a cup of tea. I looked forward to it every day.


These bars are not exactly like an almond finger, but it is close enough for me and I am so happy with it. It passes my test, and I'm pretty stringent. Now I can make a new tradition with these Almond bars, soft and moist, with a bit of a gooey chew, and a lovely sweet almond flavour. And it is incredibly easy to make. 


INGREDIENTS: 
90g cup ground almonds 
75g caster sugar 
3 Tblsp soya milk
75g dairy free margarine 
25ml oil (for this recipe I used rapeseed oil) 
75g demera sugar 
2 Tblsp golden syrup 
225g gluten free flour (I use a mix of 125g rice flour, 50g potato flour and 50g tapioca flour) 
1/4 tsp salt 
1 tsp baking powder 
1/2 tsp baking soda 
1/2 tsp vanilla essence
1/2 tsp almond essence 


METHOD: 
1) Preheat oven to 150C / 300F / Gas Mark 2 
2) Mix almond, caster sugar and soya milk into a paste. 
3) Add margarine and oil and cream together. 
4) Add demera sugar, golden syrup, vanilla and almond essence and mix until smooth. 
5) Combine flour, salt, baking powder and soda in a separate bowl. 
6) Add to mixture and combine well. Depending on the flours you use you may need to add more flour. You want quite a thick cake like batter.
7) Bake in the centre of the preheated oven for 45 mins. 
8) Remove from oven and brush while still warm with melted golden syrup for a sticky top. 


Note: The last batch I made I didn't have enough margarine, so used 25g marg and 75ml oil, and they still turn out beautifully

Thursday, May 20, 2010

Exercise


Exercise

Exercise is important for everyone, but I personally feel it is essential to maintaining a good feeling for those with Colitis and Crohn's. I know it can be hard when a lot of the time you feel so tired and not really up for much, but keep it up, go for walks, get on your bike, do a routine and keep doing it.

At the moment, my morning's journey takes me about 30mins by bicycle, up a hill, the last stretch of which is quite steep, and it is about 20 mins to get back home in the afternoon. There are some mornings when I wake up and the thought of getting on my bike and making that journey seems far too difficult, but I do it, every day. I do it because I love my bike, and I refuse to let my Colitis be the boss of me and tell me I can't ride my bike. I won't let that happen. And it can be exhausting, and it can wear me out sometimes, but I feel so much better for it. I'm tired, but I feel energised at the same time, if that makes sense. And I know if I gave in and stopped cycling, and took the bus instead because it is easier, I would feel much worse and much more tired.

Now, 50 mins cycling a day could be too much for some people, I used to be a bicycle messenger, cycling the city for 7 to 8 hours a day, so I've known a high level of fitness in my time, so it is probably easier for me.
What I suggest for those who weren't at high levels of fitness to start with something easy, go for a walk, do a few sit ups, something, even when you are tired and don't want to get up, just do it, but of course take it easy.
Then push yourself a bit more, and a bit more, but only as far as you think you can go, and then go just that little bit more. And maintain it, do your choice of exercise every day or most days. It doesn't have to be a lot, as long as it is more than what you are doing now.

It works for me. Find what works for you. I hope it will help.

Tuesday, May 11, 2010

Gluten Free / Dairy Free Pancakes

Made these at the weekend. I tend make these most weekends, usually on Sundays. Dave loves them, he's usually the one who requests them, sometimes asking they be brought to him in bed (like that's going to happen). They may take longer to make than a bowl of cereal, but they are sooo well worth it. My mouth is starting salivate just thinking about them.

Last weekend, while i was making them, I realised I didn't have enough soya milk, but had plenty of coconut milk in the fridge, so used that along with the soya milk and to my pleasant surprise made the pancakes exceptionally tasty and I've decided to use coconut milk from now on (as long as I have it in the fridge that is)

INGREDIENTS:

1 cup rise flour
1/2 cup potato flour
1/4 cup tapioca flour
(or use 1 3/4 cup of your favourite flour mix)
2 Tblsp caster sugar
2 tsp baking powder
1 tsp soda
1/2 tsp salt
1 tsp cinnamon

1/2 soya milk
1/4 coconut milk
3 Tblsp Oil
2 Eggs (separate yolk from white)
1/2 tsp vanilla or lemon juice

METHOD:

1) Combine dry ingredients
2) Combine egg yolks and wet ingredients
3) Whisk the egg whites separately until stiff. This will make your pancakes fluffy
4) Pour wet ingredients into dry and stir to combine
5) Add the egg whites to the mixture and gently fold in
6) Spoon the mixture into a hot and oiled fry pan. When lots of little bubble holes appear, it is ready to flip.
7) Serve with your favourite topping. I like fresh lemon juice and maple or golden syrup


Monday, May 10, 2010

Psyllium Husk Powder


May 2010
Psyllium Husk Powder

Psyllium husk comes from part of a seed of a plant called Plantago Ovata. It is a soluble fibre and becomes gel-like when mixed with water. It is great for gluten free baking, particularly breads, as it helps to add springyness making them less crumbly, so works well as a gluten replacer, as well as adding a nice flavour to bread.

I find it is of particular benefit to myself, as someone with Colitis, because it is a soluble fibre and helps moves things slowly and smoothly through your system. I have been using it for 2 months now and I find it really helps.

But I am just one person and this product may not be suitable for you. I am not an expert and I suggest you ask your doctor if Pysllium husk will be suitable for you. I think you should always seek medical advice before taking supplements.

Psyllium husk powder can be found in most health shops. It should be naturally gluten free but you should check with the manufacturer of the brand to make sure.

Friday, May 7, 2010

Vegan Whiskey Chocolate Truffles


The first time I made these, I made specifically because I had a bottle of whiskey that I was given as a gift but I couldn't use because I don't drink (hurts my tummy). I was racking my brain trying to think what to put whiskey in so I could cheatingly have it, then it just popped into my brain, truffles.

A simple quick recipe, though it was tricksey for me at times. First time I made it, perfect, delicious, luxurious. The next three times, it was too melty, then too hard and crumbly, then too melty again. And every time since it has been grand, perfect, yum yum yum.

Normal chocolate truffle recipes use cream, but to make it dairy free and vegan, I use coconut milk, or coconut cream, they both work well. And it doesn't even taste like coconut.

INGREDIENTS:

250g Dark Chocolate, the darker the better
80ml Coconut milk or coconut cream
45ml Whiskey
Cocoa powder for rolling the truffles

METHOD:

1) Bring the coconut milk/cream to a boil, all bubbling and dancing.
2) Take off the heat and add the chocolate. Whisk until it is all smooth and shiny looking. (Good tip, make sure the chocolate is in small pieces, it will melt easier this way.)
3) Then add in the whiskey and give it a good ol' whiskin, mix it well. I find it helps if you heat the whiskey up a little before adding it to the mixture.
4) Then just pop it into the freezer for a couple of hours, check it every hour and see how it is getting on. It should be firm yet malleable, easy to shape into balls and not sticky and melting on your fingers.
5) When it is ready, scoop and roll into balls and roll the little beauties around in some cocoa powder in a bowl, then eat them or wrap them individually or put them in a box. You might need to pop them back in the freezer for a bit to firm them up again.

Of course, you can use whatever liquor you want, I expect brandy would work well, or if you just want plain truffles, substitute the whiskey with more coconut milk, just boil it all, then add the chocolate. Enjoy!